
R2-D2 Part 2: Ring 1
Building Ring 1 of my full-size R2-D2 brought more supports, failed prints, alignment issues, and assembly challenges — but the project is finally starting to take shape.
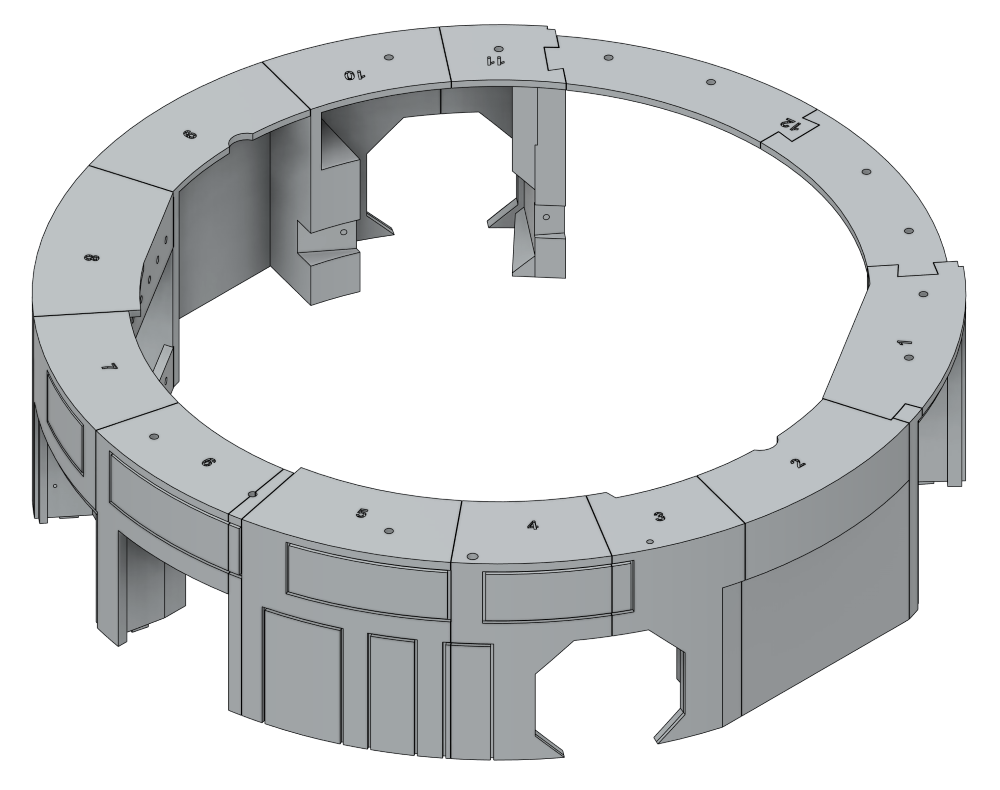
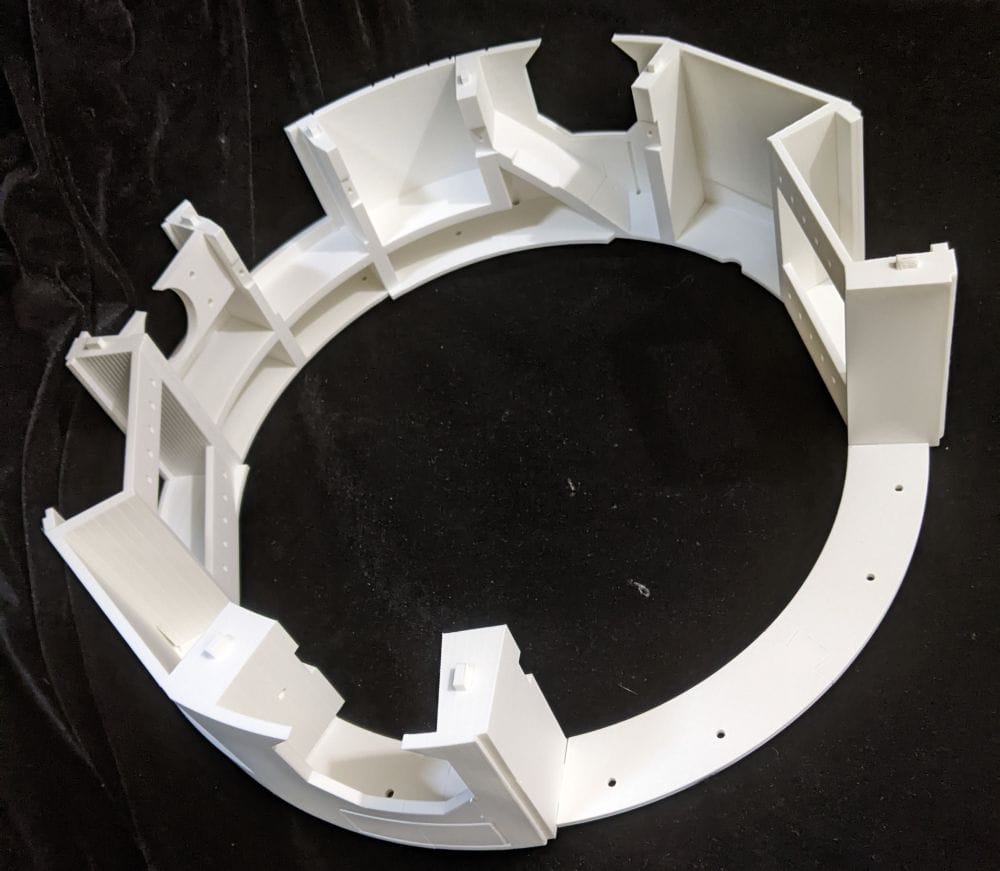
On to Ring 1, shown here. This section is made up of 12 parts and, unlike the base ring, most of these require supports during printing.
This is where the build starts to become a bit more involved. The parts have more detail, deeper curves, and larger overhangs, so print times creep up and there’s noticeably more clean-up work afterwards. Compared to the base ring, this stage feels less like printing simple structural parts and more like working on pieces that will eventually define the shape and character of the finished R2 unit.
Support removal is definitely something worth taking slowly here. Some of the thinner edges and detailed sections can be marked quite easily if you rush the clean-up, especially around curved surfaces. A careful pair of flush cutters and a bit of patience make a huge difference.
The design still uses alignment holes for 1.75mm filament pegs, which should help keep everything lined up during assembly. After the slightly messy experience gluing the base ring, I’m paying much closer attention to tolerances and dry-fitting parts before committing to glue. It’s already clear that small alignment errors at this stage could become much bigger problems later in the build.
Even so, Ring 1 feels like an important milestone. Once these parts are assembled, the project starts to look less like a collection of printed panels and more like the beginning of a full-sized R2-D2.
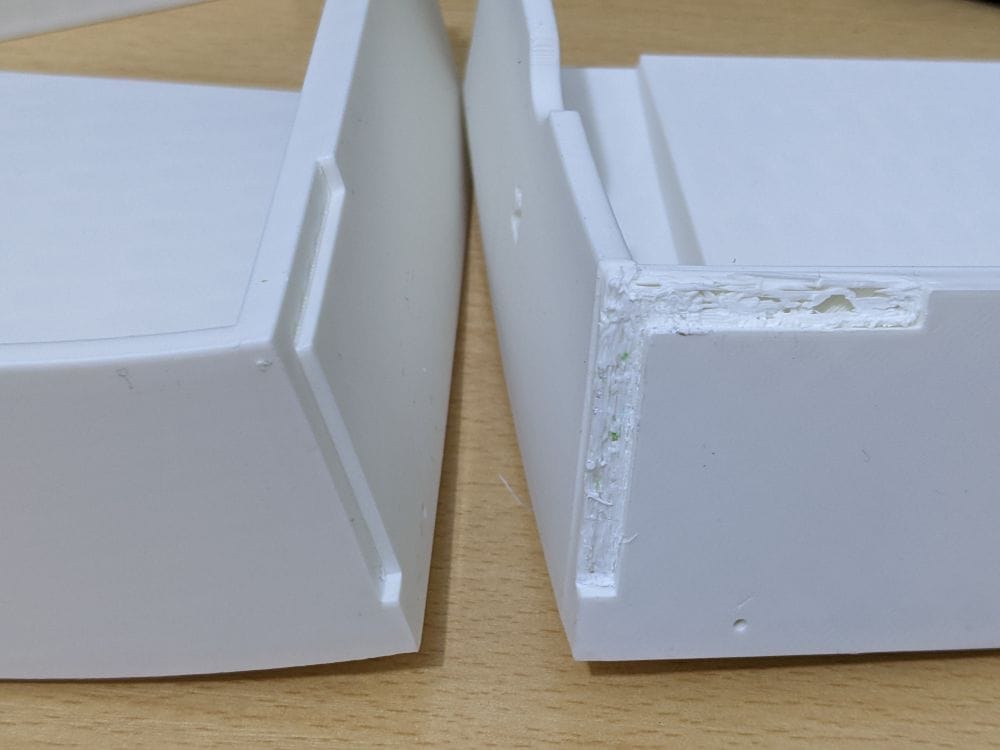
For the first part, MB-Ring 1-1, I decided to ignore the recommended settings and try printing it without supports, just to see how well it would cope on its own. Surprisingly, it actually turned out better than I expected, although it definitely wasn’t perfect.
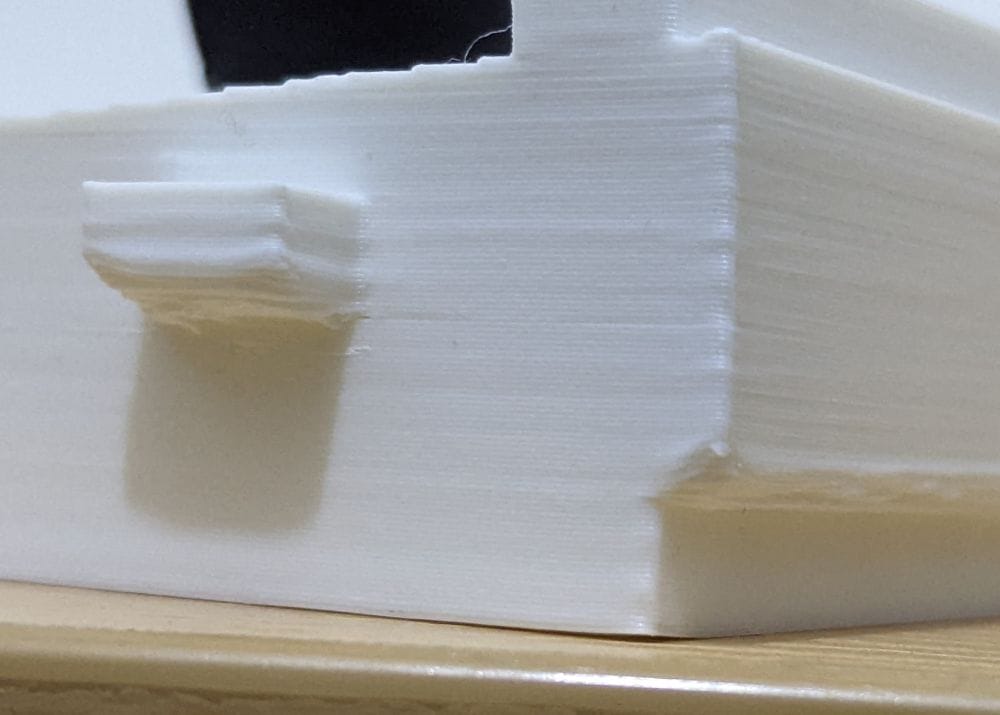
The locating lug didn’t form quite correctly, and the stepped section came out fairly rough, most likely because there was nothing supporting the layers underneath while they printed. The part is still usable, but it’s a good example of why some of these files really do benefit from having supports enabled.
It’s very much a trade-off between saving print time and filament versus getting a cleaner, more accurate finish straight off the printer. For simple parts, skipping supports can sometimes work surprisingly well, but Ring 1 is clearly starting to push beyond that comfort zone.
For the remaining parts, I’ll probably stick much closer to the recommended print settings. At this stage of the build, spending a bit more time printing is likely worth it if it saves clean-up and fitting problems later on.
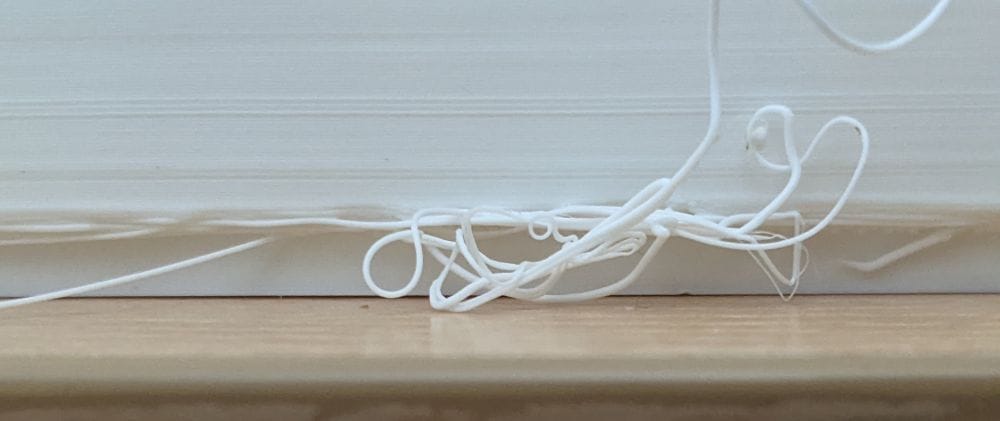
For MB-Ring 1-2, I decided to experiment with using PETG as a support interface layer. In theory, it’s a great idea — the PETG doesn’t bond strongly to PLA, so supports can often peel away much more cleanly and leave a better surface finish behind.
Unfortunately, this attempt didn’t quite go to plan.
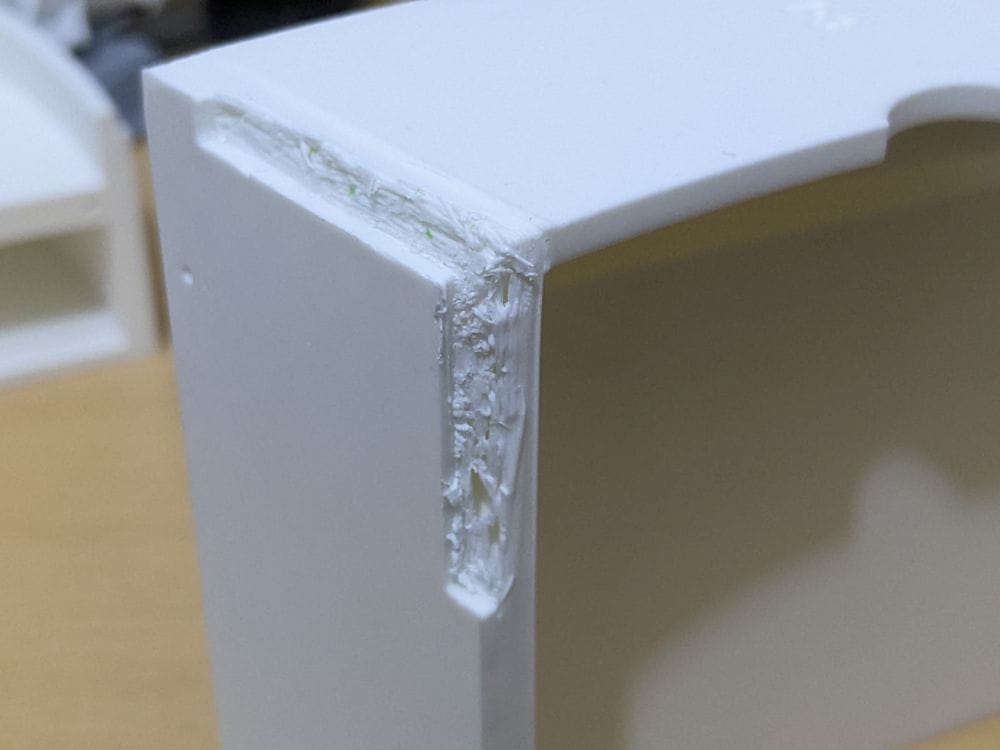
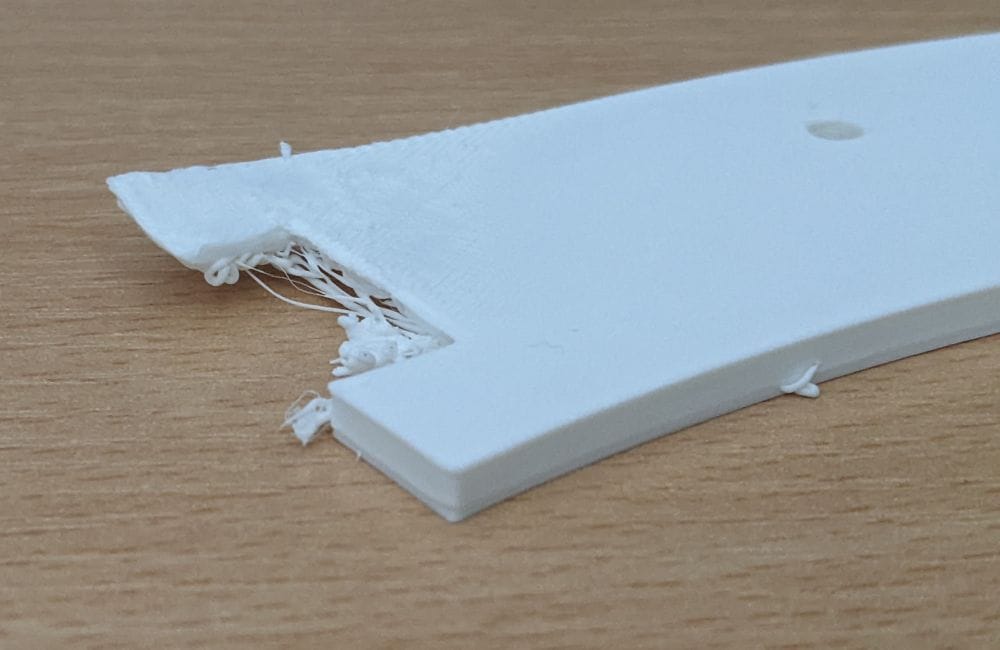
The PETG didn’t adhere properly to the print bed, which quickly turned into a fairly messy print overall. Thankfully, most of the damage is on the inside of the part, so very little of it should actually be visible once everything is assembled.
The bigger concern is the cut-out section that needs to mate cleanly with the next part in the ring. On pieces like this, fit matters far more than cosmetic appearance, and even small distortions could cause alignment problems later during assembly. Because of that, I may end up reprinting this section just to be safe.
It’s another lesson learned during the build. Mixing materials for support interfaces can definitely be useful, but only if both materials behave properly from the very first layer. When they don’t, things can go downhill surprisingly quickly.
For MB-Ring 1-3, I adjusted the approach slightly and used PETG only as the support interface layer, rather than letting it make direct contact with the print bed. This worked far better.

By letting the PLA handle the first layers on the build plate and using the PETG purely where the supports touched the model, the print avoided the adhesion problems I ran into on the previous part. Everything printed much more cleanly, and the PETG separated from the PLA surprisingly easily once the print had finished.
The difference in surface quality was immediately noticeable. Areas that would normally need a fair amount of clean-up came away looking much cleaner, with far less damage from support removal.
This definitely feels like the better approach going forward — getting the benefits of PETG support interfaces without the downside of unreliable bed adhesion. It’s one of those small workflow changes that can make a big difference once you start printing larger and more detailed parts like these.
But my problems didn’t end there. Parts MB-Ring 1-4 and MB-Ring 1-5 both printed perfectly with no issues at all, which was a welcome break after the earlier experiments.
MB-Ring 1-6, however, turned into another learning experience.
This section comes as two separate pieces. The main part printed without any trouble, but the smaller section failed on the first attempt. I cleaned everything up, tried again, and watched it fail in almost exactly the same way a second time.
After taking a closer look at the model orientation, I realised the issue was actually caused by a small area of the part not sitting fully flat on the print bed. That tiny gap was enough to cause poor adhesion in the early layers, which then led to the print failing further up.
For the third attempt, I flipped the part over and printed it the opposite way up. That simple change completely solved the problem, and the print finished successfully.
It’s another reminder that print orientation can make a huge difference, especially with smaller or more detailed parts. Sometimes the solution isn’t changing temperatures or settings — it’s just looking at how the model is sitting on the bed.
MB-Ring 1-7 through MB-Ring 1-10 all printed perfectly with no issues at all, which finally made it feel like things were settling into a smoother routine.
MB-Ring 1-11, though, had other ideas.
When preparing the print, I forgot to add supports to one small area. At first, everything looked fine, and the print carried on for quite a while before I realised something wasn’t right. By the time I spotted the issue, the print was already around halfway complete.
Unfortunately, the unsupported section had started to sag and fail, so there wasn’t really any saving it. I cancelled the print, went back into the slicer, added the missing supports, and started again.
With the supports properly in place, the second attempt printed without any problems at all.
It was another straightforward but important reminder to double-check support placement before starting a print, especially on parts with awkward overhangs like these. At this size, losing several hours to a missed support is frustrating, but it’s all part of the learning process.
The final part of Ring 1, MB-Ring 1-12, is once again made up of two separate pieces. Compared to some of the earlier sections, these are very simple prints — flat, straightforward, and the sort of parts you expect to run without any drama.
Naturally, that’s when I ran into another problem.
In my haste to get the print started, I skipped cleaning the print bed beforehand. Predictably, the issue came straight back to bite me. One of the parts lost adhesion partway through the print, lifted from the bed, and failed completely.
It’s a good reminder that even the simplest prints can fail if the basic preparation isn’t done properly. Bed adhesion really is one of those fundamentals that affects everything, regardless of how easy the part looks.
After giving the print bed a proper clean and starting again, both parts printed exactly as expected with no further issues.
Overall, Ring 1 was definitely a step up from the base ring, with more parts, more supports, and a lot more attention needed during both printing and clean-up. It felt like the point where this stopped being a collection of simple prints and started becoming a proper large-scale build project.
There were a few problems along the way, mostly caused by print settings, support placement, bed adhesion, or part orientation, but none of them were serious enough to stop progress. In every case, the fix was either a simple reprint or a small adjustment to how the part was prepared.
Looking back, Ring 1 turned into a useful learning stage. I experimented with support materials, discovered how much orientation can affect smaller parts, and was reminded more than once that basic preparation still matters, even on “easy” prints.
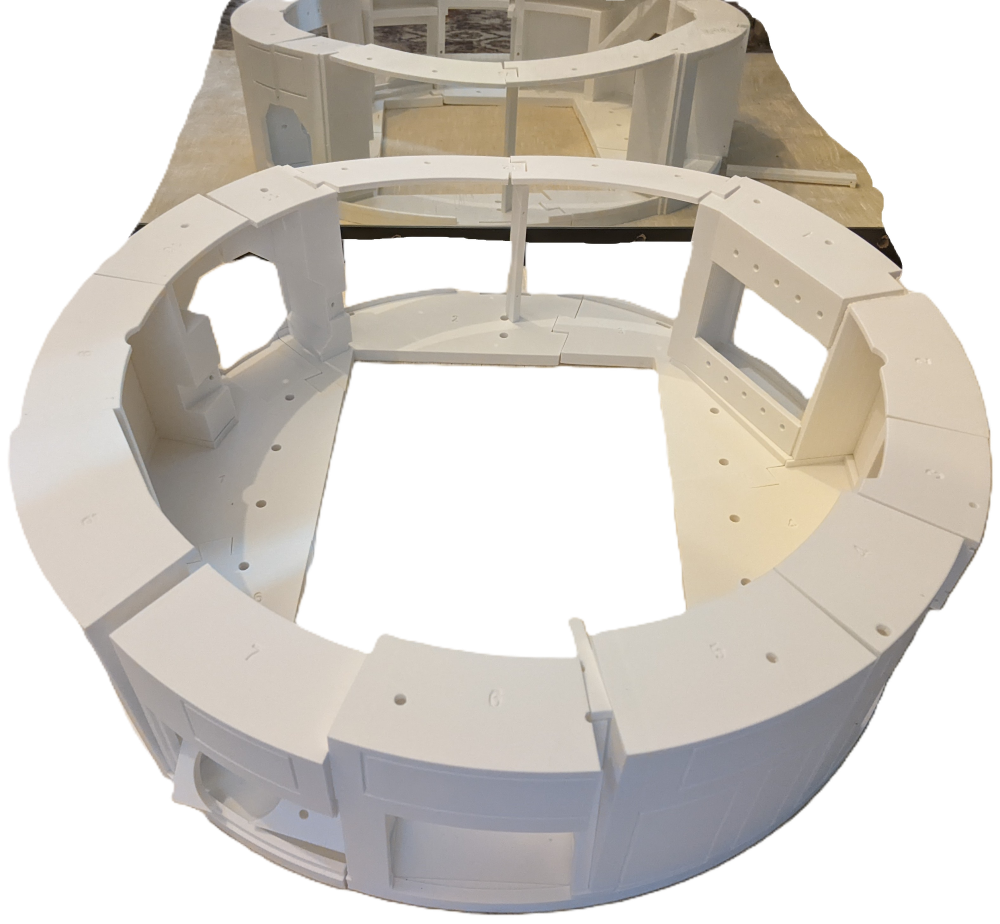
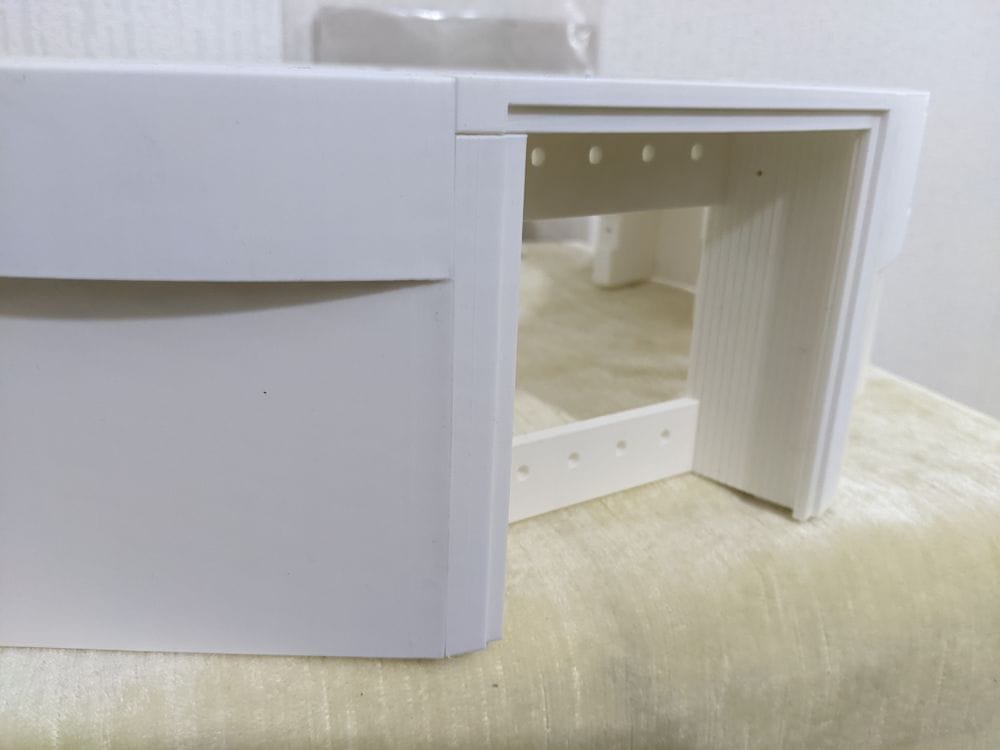
Here is a test fit of all the parts before any glue is applied. Even though everything is still loose, slightly unstable, and trying to fall over, this is the point where the project really starts to come alive. Seeing the ring assembled for the first time gives a much better sense of the overall scale and shape of the finished R2-D2.
Gluing Ring 1
When it came time to start gluing Ring 1 together, I ran into another small issue. The parts are designed with holes for short lengths of 1.75mm filament to act as alignment pegs, but on several pieces the holes hadn’t printed especially cleanly, so the filament wouldn’t fit properly.
My original plan was to run a small drill bit through the holes to clean them out and slightly open them up, but I didn’t have the right size drill bit to hand at the time. Instead, I decided to try working around the problem and rely more on carefully lining the parts up manually.
For the most part, that approach worked reasonably well, apart from MB-Ring1-1.
This section is made up of two parts. I laid everything out, aligned it against MB-Ring1-2, and glued the smaller piece into position. Unfortunately, while the glue was setting, the smaller section shifted slightly and ended up bonded out of alignment.
It wasn’t a catastrophic mistake, but it was definitely frustrating after spending so much time getting the prints right. It also reinforced how useful those alignment pegs would have been if the holes had printed cleanly in the first place.
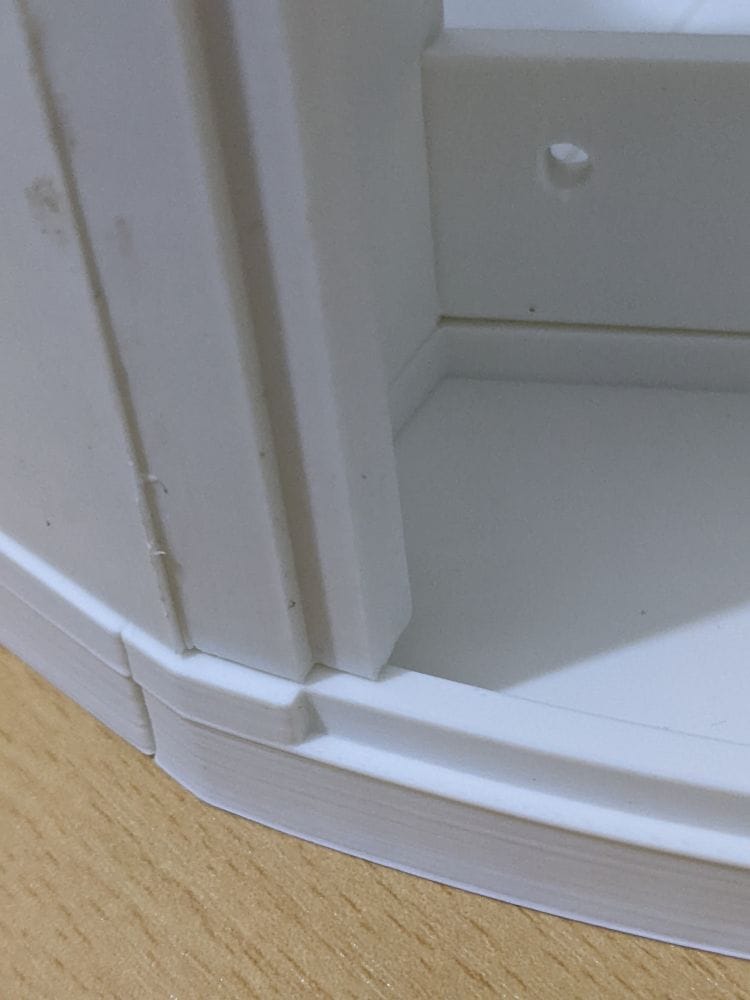
Because the Ring 1 sections have locating lugs that slot directly into the base ring, I decided to use the assembled base ring itself as a guide while fixing everything together. It turned out to be a much better way of keeping the parts aligned and maintaining the correct curve across the ring.
At this point, the earlier printing issues with MB-Ring 1-2 started to become more obvious. Because of the rough areas and slight distortion from the failed PETG support attempt, it didn’t mate cleanly with MB-Ring 1-1, making alignment more difficult than it should have been.
Rather than fight with a part that I already knew wasn’t quite right, I decided it was better to simply reprint MB-Ring 1-2 properly. It was one of those moments where spending a few more hours printing would save a lot more frustration later during assembly.
Using the base ring as a fixing guide, combined with a cleaner reprint of MB-Ring 1-2, made the whole section fit together much more naturally and helped keep the overall shape of the ring consistent.
With MB-Ring1-6, which is made up of two separate pieces, I wanted to avoid repeating the alignment problems I’d already had with MB-Ring1-1. This time, instead of fully gluing the parts together straight away, I tried a more cautious approach.
I fitted the two sections together first, checked the alignment carefully, and then applied a small amount of glue only along the inside edge. Rather than fully bonding the joint straight away, I was hoping the small internal tack of glue would be enough to hold the parts together permanently while keeping everything aligned correctly.
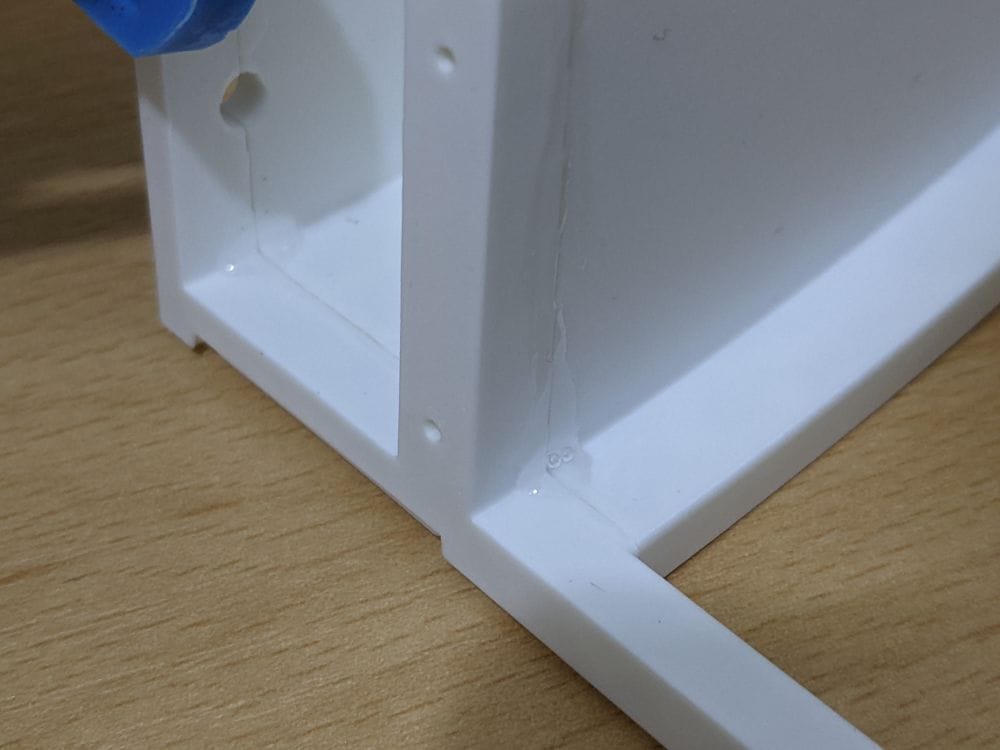
Thankfully, it seemed to work really well. The parts stayed in position, the alignment was much better than my earlier attempt, and because the glue was mostly hidden on the inside, it also avoided excess adhesive squeezing out onto the visible surfaces.
It turned out to be a far less stressful way of assembling the multipart sections, especially compared to the earlier attempt where one small slip left a section permanently out of line. Sometimes slowing down and changing the assembly method slightly makes a much bigger difference than changing the print settings themselves.
After the earlier alignment problems, I slowed things down and became much more methodical with the assembly process. Before applying any glue, I carefully dry-fitted each section to check how well it lined up, worked out exactly where the glue needed to go, and then practised the assembly a few times first.
The routine became: glue, fit, line up, hold — but only after rehearsing the whole sequence beforehand. It might sound excessive, but with larger multipart prints like this, once the glue grabs there’s very little time to correct mistakes.
That approach worked really well for most of the ring sections and made the assembly process far less stressful than the earlier attempts.
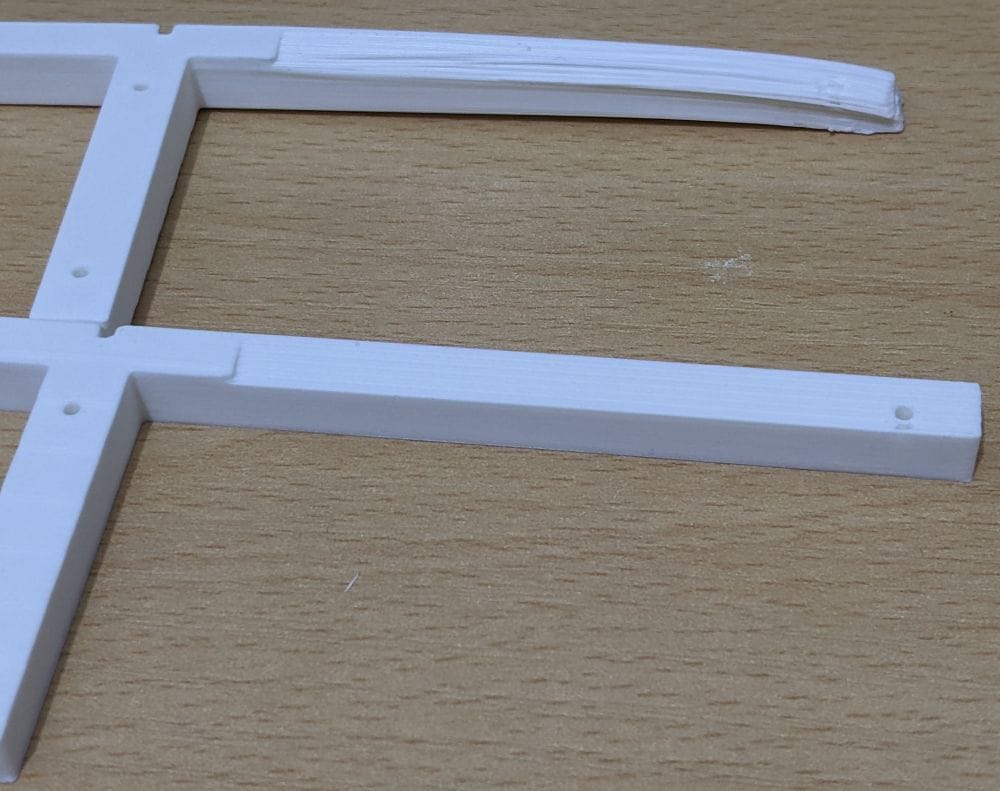
When I reached MB-Ring1-7, things became a little more awkward. This section is made up of three separate pieces, and one of them — highlighted here — was particularly small and fiddly to position.
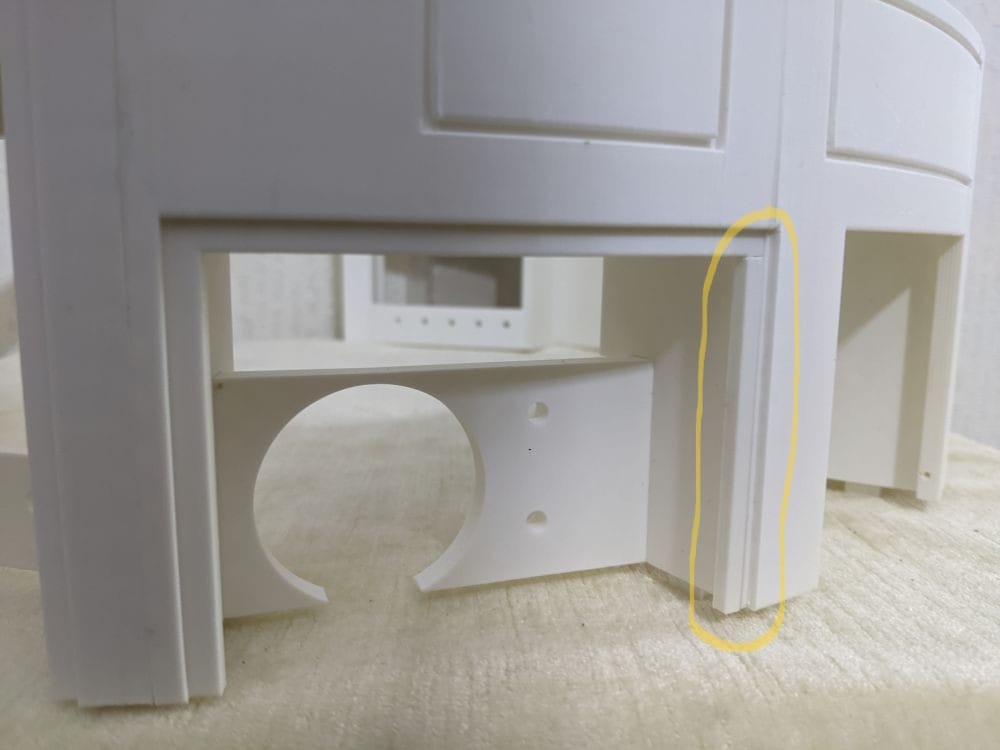
Trying to hold everything in alignment while also applying glue quickly became a bit of a juggling act. Compared to the earlier sections, this was the first part that genuinely felt fiddly to assemble rather than simply careful and time-consuming.
The highlighted piece was aligned against MB-Ring1-6 first and fixed in place using the same method I’d used successfully on MB-Ring1-6 itself — just a small dab of glue on the inside acting as a hidden tack point.
Once that small section was secure, I could then glue MB-Ring1-7 to MB-Ring1-6 using the now familiar routine: rehearse, glue, fit, line up, hold.
With those sections correctly positioned, the middle piece then slid neatly into place much more easily than expected. In the end, taking the assembly in stages turned out to be far more manageable than trying to glue all three parts together at once.
Part MB-Ring1-8 is effectively the opposite-hand version of MB-Ring1-1 — the section where my alignment had previously gone wrong — so this time I approached it a bit differently.
Rather than trying to glue everything together in one go, I first attached the smaller section to MB-Ring1-9 using the same inside “tack dab” method that had worked well earlier. That tiny glued area acted almost like a hinge, allowing the piece to stay aligned while still giving me enough movement to position it properly.
Once everything was sitting correctly, I added more glue and fixed the part into place permanently. This worked far better than my earlier attempt on MB-Ring1-1, and the alignment came out exactly as intended.
After that, the rest of the ring assembly went much more smoothly. Using the now familiar routine of rehearse, glue, fit, line up, hold, I worked my way through the remaining sections and finally completed Ring 1.
Ring 1 turned out to be a much bigger learning experience than the base ring. The prints themselves introduced more complicated overhangs, support requirements, and orientation issues, while the assembly highlighted just how important alignment and patience are on a large multipart build like this.
There were plenty of small setbacks along the way — failed supports, bed adhesion problems, awkward multipart sections, and alignment mistakes during gluing — but each issue helped refine the process a little further. By the end of the ring, I’d settled into a much better workflow for both printing and assembly, especially when dealing with smaller detailed sections.
Most importantly, this is the stage where the project really started to feel like a full-sized R2-D2 rather than just a collection of printed parts. Seeing Ring 1 assembled on top of the base ring gave a real sense of the scale, shape, and progress of the build, even if there’s still a very long way to go.