
R2-D2 Part 6: Centre Leg Support
Building the modified Centre Leg Support tested both my printer and my patience. From missing files and print failures to filament shortages and final assembly, this hidden structural component proved far more challenging than expected.
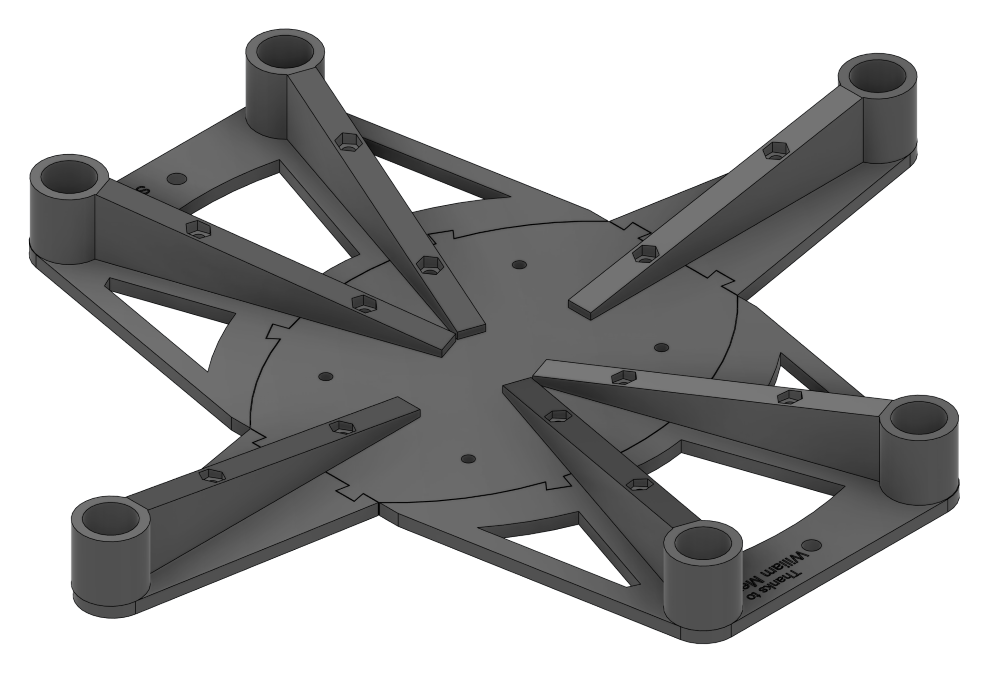
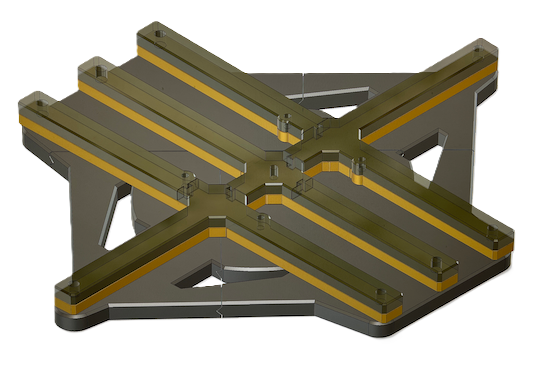
Centre Leg Support
At first glance, the Centre Leg Support looked like it would be one of the easier parts of the build. It consisted of only a handful of pieces that needed printing and gluing together, and compared to some of the larger body sections I had already completed, it seemed fairly straightforward.
Unfortunately, this part was about to introduce me to one of the most frustrating printing problems I had encountered so far.
The first issue appeared before I had even started printing. The Centre Leg Support files were not included in the set of STL files I had downloaded. Fortunately, the original Fusion 360 design files were available, so I opened those and exported the parts myself. With the missing files finally created, I could begin printing.
Because this assembly would eventually support the centre leg and carry a significant portion of the R2-D2 body's weight, I decided to print the parts with stronger settings than usual. The extra strength increased the print time slightly, but I felt the additional durability would be worth it in the long run.
The first print completed successfully, but it wasn't perfect. Several corners had lifted slightly from the build plate, causing some noticeable warping. More importantly, the alignment lugs that joined the sections together had not printed particularly well. Rather than accept a compromised part, I decided to reprint it and add a brim to help keep the corners firmly attached to the build plate.
That decision turned out to be the start of a much bigger problem.
The reprint failed completely. Partway through the print, the model detached from the build plate and became tangled around the hotend, leaving a mess of filament everywhere. After spending some time cleaning everything up, I prepared to try again.
Before I could restart the print, the Bambu A1 prompted me to install a firmware update. After updating the printer, I loaded the file and pressed print once more.
The result was immediate failure.
The filament wasn't sticking to the build plate at all. Instead, it curled up around the nozzle and formed a tangled blob. I stopped the print, cleaned everything, and tried again.
Exactly the same thing happened.
Assuming the build plate simply needed cleaning, I washed it thoroughly and made another attempt. Once again, the filament refused to stick and simply collected around the hotend. By now I had repeated the cleaning process several times and was becoming increasingly frustrated.
Searching through various online forums revealed several possible causes. One common suggestion was that the hotend assembly might have become loose. That sounded plausible, so I dismantled the hotend assembly, removed the rear cover, anchecked all the screws.
https://wiki.bambulab.com/en/a1-mini/troubleshooting/print-issues-troubleshooting
Several of them were indeed loose.
At that point I was convinced I had found the problem.
Everything was tightened, reassembled, and another print was started.
Failure.
The filament still refused to stick to the build plate.
More cleaning followed. More failed attempts followed.
By now I was beginning to wonder whether the hotend itself had reached the end of its life. Perhaps the recent firmware update had introduced an issue. Maybe there was something else wrong with the printer entirely. Whatever the cause, I couldn't find any definitive answers.
Eventually I ordered a replacement hotend, assuming that my printing would be on hold until it arrived.
While waiting, I decided to make one final effort to diagnose the problem. Looking back over everything I had tried, one possibility stood out. I had been repeatedly cleaning the build plate, but I suddenly realised that the sponge and cloth I was using were not nearly as clean as I had assumed. If they contained grease, detergent residue or contaminants, I might simply have been spreading dirt around the plate rather than removing it.
Armed with a brand-new sponge and a freshly washed cloth, I gave the build plate one final thorough clean.
At around the same time, I discovered a modified version of the Centre Leg Support created by Tim Hedel and decided to use that version instead.
With nothing left to lose, I loaded the file and decided to use my grey filament to save in the white I was using as these parts would be inside the body, I started the print and this time the filament stuck perfectly.
Layer after layer printed exactly as it should, and for the first time in days I could relax and watch the printer do its job.
It appears the cause of all the trouble may simply have been a build plate that wasn't as clean as I thought it was. After countless failed attempts, checking screws, researching firmware issues, and even ordering a replacement hotend, the solution may have been nothing more complicated than using a genuinely clean sponge and cloth.
Sometimes the simplest explanation really is the correct one.

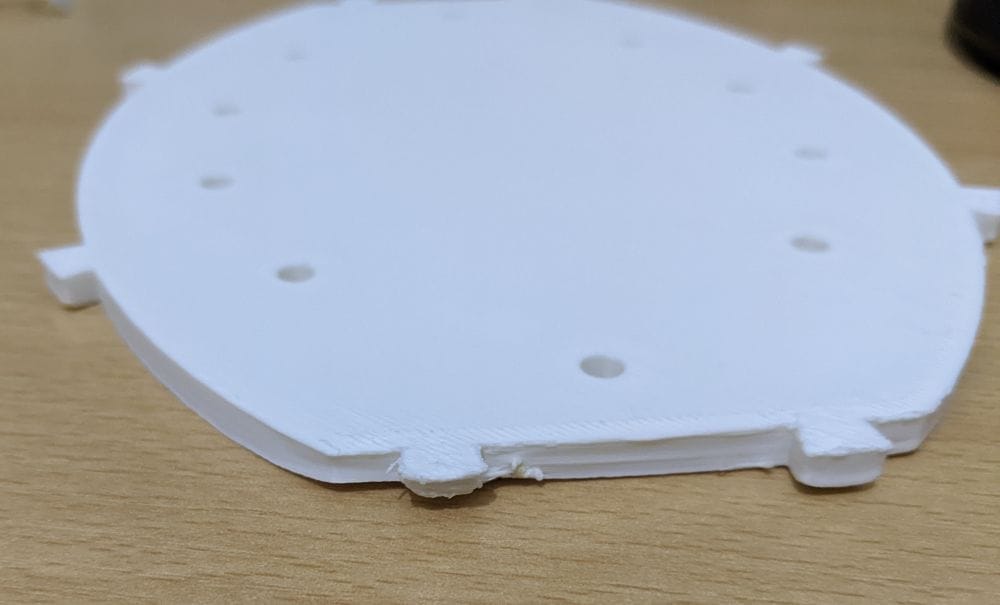
Looking closely at the first part that came off the printer, I noticed a slight amount of curling on some of the corners. It wasn't enough to ruin the part, but because these pieces would eventually be glued together and help support the centre leg, I wanted them to be as accurate and flat as possible. To try and prevent the corners from lifting during future prints, I decided to add a brim around the model. My hope was that the extra material attached to the build plate would hold the edges down more securely and eliminate the warping altogether. It seemed like a sensible precaution at the time.

The second piece, printed with a brim, came out far better than the first. The corners remained firmly attached to the build plate throughout the print, and there was no noticeable lifting or warping. Once the print had finished, all that was required was a little clean-up to remove the thin strip of excess material where the brim had been attached to the part. A quick trim with a craft knife soon had everything looking neat and tidy. The finished piece was flat, clean and accurately printed, exactly what I had been hoping for when I decided to add the brim in the first place. At that point, it looked as though the corner-lifting problem had been solved and I could continue printing the remaining parts without any further issues. Unfortunately, things were about to become a lot more complicated.
White Gloves
Around this time, I also decided to make a small change to my printing routine in an effort to keep the build plate as clean as possible. Over the years I have accumulated various bits of equipment for other hobbies, including a pairs of white cotton gloves that I normally use when handling 35mm negatives during film scanning.
Because fingerprints, skin oils and other contaminants can affect print adhesion, I opened a brand-new pair and dedicated them solely to my 3D printing work. From that point on, whenever I removed a completed print from the build plate, I wore the gloves rather than handling the plate directly. It might have seemed a little excessive, but after experiencing several adhesion-related issues, anything that helped reduce the transfer of grease and residue onto the build surface was worth trying. Whether it made a significant difference or not, it gave me one less potential cause of printing problems to worry about.
With the base of the Centre Leg Support finally printed, I could move on to assembly. The various sections glued together without too much trouble, although the fit wasn't quite as perfect as I had hoped. Some of the joints were slightly misaligned and a few edges didn't line up exactly. Under normal circumstances that might have bothered me, but this entire assembly is hidden inside the body and won't be visible once R2-D2 is completed, so absolute cosmetic perfection wasn't really necessary. The important thing was that the structure was strong and everything remained square enough to perform its job.

The next task was printing the support bars. Each support bar is made up of six separate pieces that are glued together to form a much stronger assembly. I had planned to print everything in grey filament to keep the appearance consistent, but as I was printing with a stronger print setting my calculations were slightly off. Halfway through printing the first support bar, the spool ran out.
Rather than waste the partially completed print, I loaded a spool of white filament and allowed the printer to continue. Fortunately, the filament change went smoothly and the print completed without any issues. I didn't have enough to print the last part so I changed the filament to blur, After a little clean-up and brim removal, the finished support bar looked perfectly usable, even if it was now in three colours.
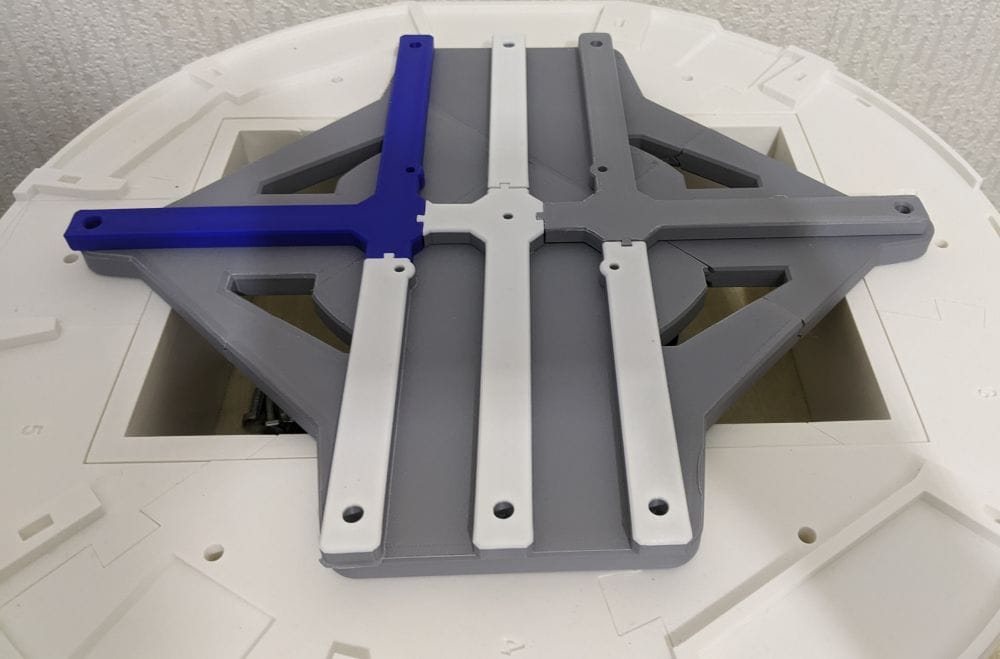
When it came time to print the second support bar, I didn't want history to repeat itself so I continued with the blue and finished the remaining pieces that way. The result was a rather colourful collection of parts, with grey, white and blue all making an appearance. Fortunately, colour doesn't matter for these components because they will eventually be hidden from view inside the finished droid.
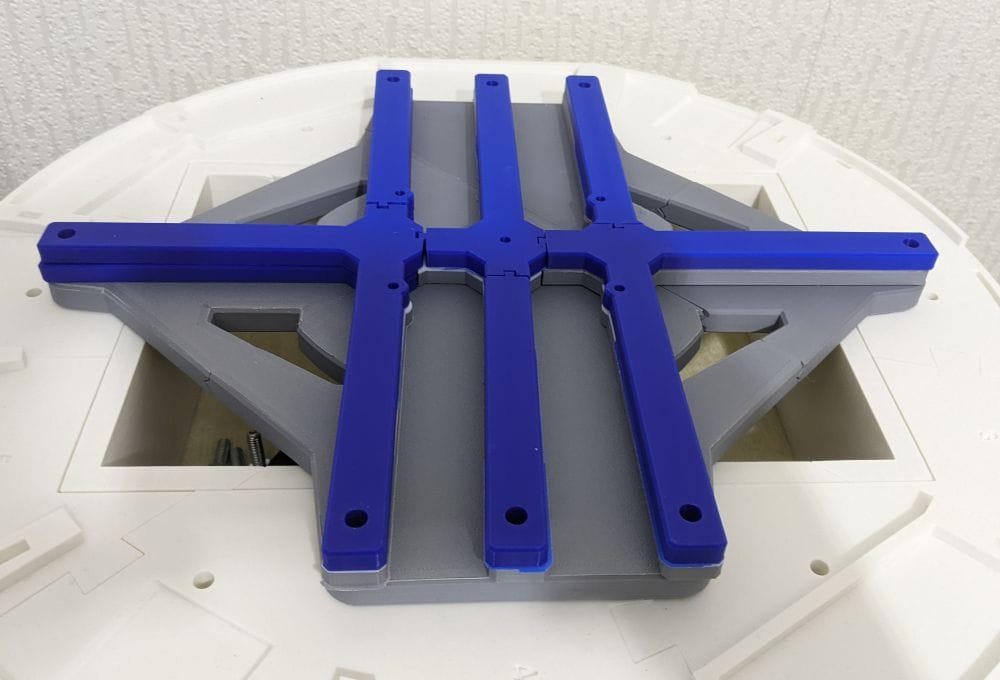
Before reaching for the glue, I assembled everything dry to make sure the parts fitted together correctly. Thankfully, the support bars lined up with the Centre Leg Support base reasonably well. A few areas would require some minor adjustment and cleanup, particularly around the bolt holes, but nothing looked serious enough to prevent assembly. Overall, it appeared that everything would fit together as intended.
Talking of bolts, this was the first stage of the build where some fairly substantial hardware was required. Attaching the foot to the Centre Leg Support base requires four M4 × 70 mm bolts, while securing the complete assembly to the body and skirt requires eight M6 × 60 mm bolts. These fixings will ultimately be responsible for supporting a large proportion of the droid's weight, so ensuring everything is aligned correctly now will save problems later when the centre leg is finally installed.
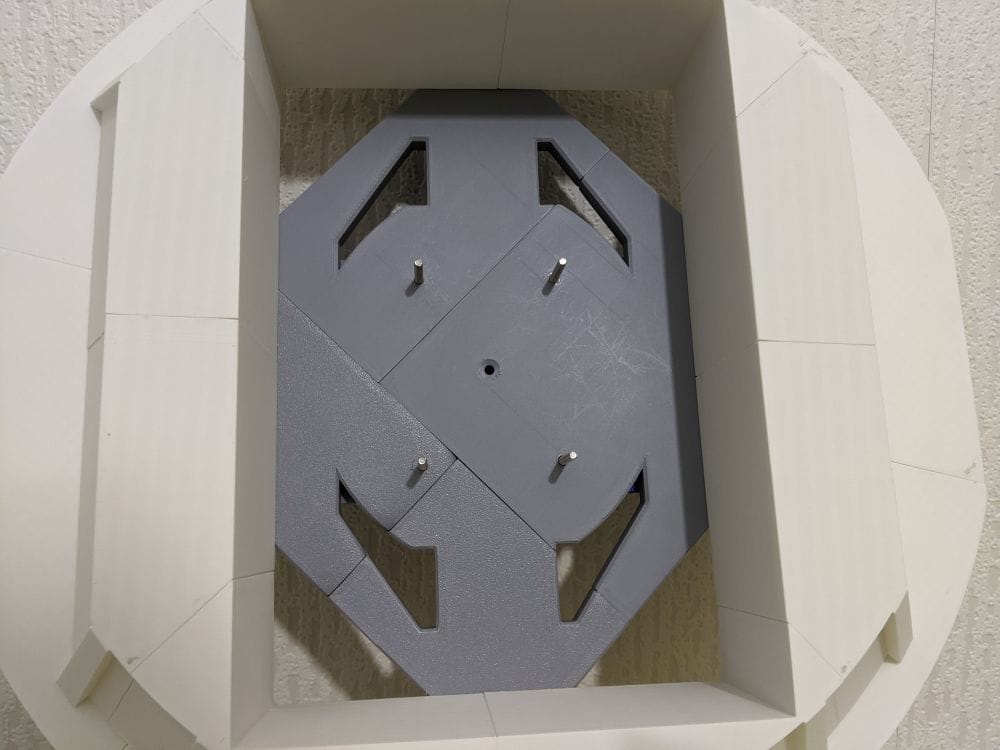
After gluing the support bars to the base, it was finally time to see how everything fitted inside the droid. The complete Centre Leg Support assembly was bolted to both the skirt and the base ring using the M6 bolts. Initially, some of the bolts felt quite tight and required a little persuasion to get started, but as they were gradually tightened down, the various parts began to pull themselves into alignment. What had looked slightly out of place during the dry fit soon settled into position, and the whole assembly became surprisingly solid.
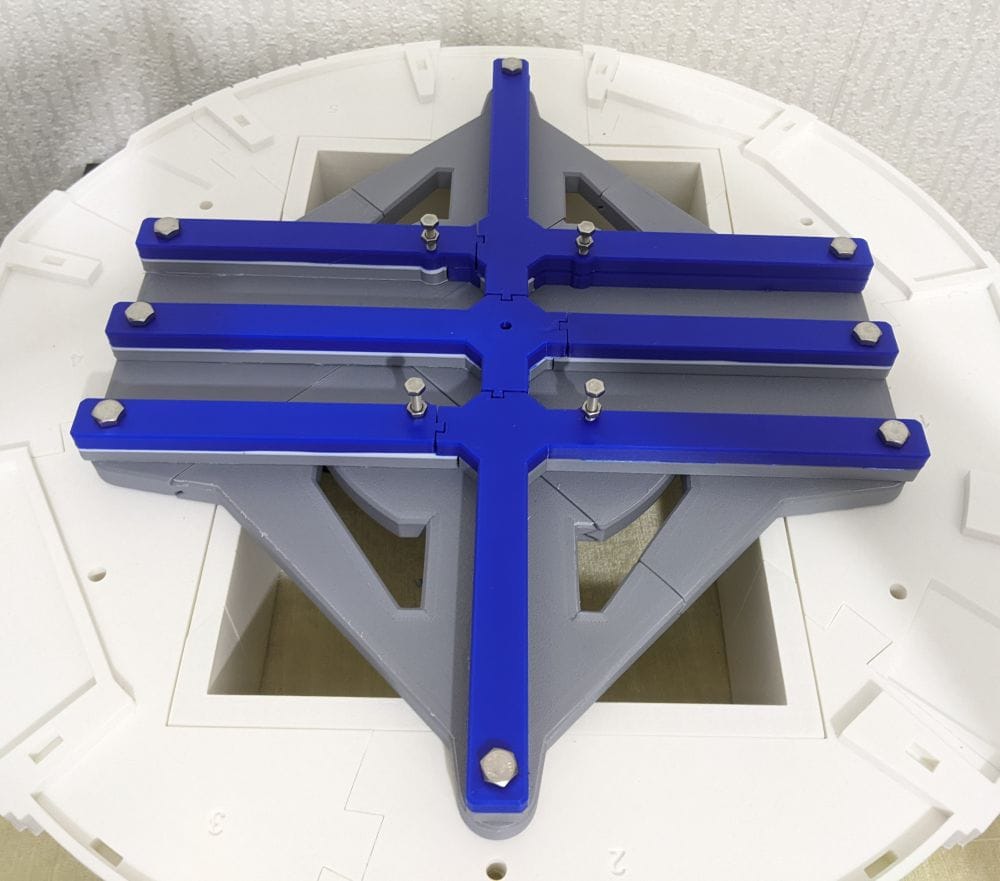
The four bolts located in the centre of the assembly were only being used as temporary alignment bolts at this stage. Their purpose was simply to keep everything correctly positioned while the remaining hardware was fitted and tightened. Once everything was secured, the support structure felt rigid and capable of carrying the loads it was designed for.
Final Thoughts
This modified Centre Leg Support turned out to be a much bigger project than I had anticipated. What initially looked like a simple collection of printed parts quickly became one of the more troublesome sections of the build so far. Between the missing STL files, the repeated print failures, troubleshooting the printer, cleaning the build plate countless times, changing filaments mid-print, and the sheer amount of material required, it certainly tested my patience.
Looking back, I do wonder whether I should have simply used the original Centre Leg Support design. It would have consumed significantly less filament and could probably have been printed using stronger print settings to achieve a similar level of strength. The modified version certainly feels robust, but it came at the cost of extra print time, additional material, and a fair amount of frustration along the way.
Cosmetically, the finished assembly isn't one of my best pieces of work. The mix of grey, white and blue filament, combined with some of the less-than-perfect joints, means it won't be winning any beauty contests. Fortunately, that's largely irrelevant because the entire assembly will be hidden inside the body of the droid and won't normally be seen.
What matters is that the Centre Leg Support is now installed, securely attached to the skirt and base ring, and appears strong enough to perform its intended role. Sometimes in a build like this, function is more important than appearance, and this is definitely one of those cases.
The good news is that the body is now gaining some real structural strength. With the Centre Leg Support in place, the lower section of the droid is beginning to resemble a complete assembly rather than a collection of individual printed parts. The next stages will continue adding strength and detail, bringing the project one step closer to becoming a full-size, working R2-D2.